Posts Tagged ‘salt dough’

Daddy Rocks!

June 19, 2009

To celebrate Father’s day, I looked for an easy craft my daughter could make for her daddy. I wanted something she could make mostly herself and something he could keep at work to put a smile on his face during a stressful day. I found this simple craft for a paperweight at Family Corner.

photo courtesy of familycorner.com

photo courtesy of familycorner.com

I love salt dough! My daughter really enjoys mixing the ingredients together and then squishing the dough. It’s a wonderful sensory experience that even toddlers or young preschoolers will enjoy. I let her smash the dough into whatever shape she wanted…this meant mostly a giant lump.

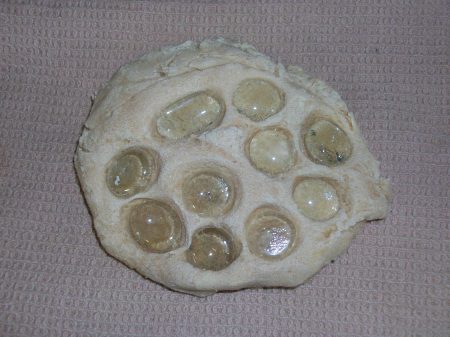
I didn’t have any pea gravel as called for in the directions, but I did find some nice glass rocks in my craft box. These are the kind of rocks you would use to put into a vase or candle arrangement. The directions state to arrange gravel pushed into the dough to spell out “Dad Rocks”. Since I wanted this craft to be hers as much as possible and since at almost 3 she can’t spell, I let her arrange the beads as she wished. She thoroughly enjoyed smooshing them into the dough.
weight 002

I placed the dough onto a cookie sheet sprayed with non-stick spray. I baked it for 2 hours at 250 degrees. Then it cooled for about an hour. It looked pretty nice just plain as it was.

But I thought it would be much more fun to let her paint it too! Daddy is a huge Dallas Cowboys fan so I happened to have navy and silver acrylic paint on hand. That part was pretty fun too!

weight 003

I made sure to let her know that this was a surprise for Daddy for Father’s day. But in true preschooler style, when Daddy asked her about her day that evening, she described the wonderful surprise she had made him! We couldn’t help but  laugh at her excitement. The best Father’s day gift for him and any dad is the adoration and love of a child. My husband has that gift 365 days a year!

What a cool paperweight!

What a cool paperweight!

Happy Father’s Day to my awesome husband who is a wonderfully loving Daddy!

For complete instructions and ideas for other Father’s day crafts visit: Dad Rocks at the Family Corner website.

Salty Rainy Day Fun

April 24, 2009

A powerful Florida rainstorm was looming. The kind of day that pre-children, I might have spent with the windows open, curled up on the couch with a good book. But instead of looking forward to the dark and cloudy day, I wondered how I was going to entertain my daughter and keep my sanity while we remained indoors all day. I needed an activity that would take up a substantial amount of our day, but that could be broken down into steps that we could squeeze in between nap, lunch and the like.

I discovered a wonderful activity that fit my quest nicely on the Slugs on the Refrigerator blog…salt dough beaded necklaces! Each step incorporates a different type of activity…mixing, shaping, baking, painting, stringing. It’s like five crafts in one. Just what we needed to amuse ourselves on this rainy day.

When I informed my daughter that we were going to make necklaces, she was happy. When I broke out the mixing bowl she was thrilled! She loves the opportunity to mix anything in the bowl, mostly because it usually results in some sort of sweet treat, but also because she gets to be a big girl in the kitchen.  We began by mixing the dough ingredients and while she was more than happy to help me measure the dry ingredients, I had to remind her that this was not something we wanted to taste test! Of course the best part was digging our hands into the dough to knead it to the right consistency. I made the whole recipe, but only used half and stored the rest in the fridge. Half of the recipe was more than enough for one child to make enough beads.

Careful measuring

Little hands...careful measuring

Next, we sat at the table and shaped the dough. Her shapes were far more creative than mine! I was careful not to tell her to make them the exact way I was. She watched the neat little balls I was rolling and flattening, but had more fun making hers into various shapes. As we made each bead, we laid them on a cookie sheet that we sprayed with non-stick spray. When she was otherwise occupied, I made holes in each bead with a wooden skewer. That was one step I just felt she wasn’t ready to handle…maybe next time. After making the holes, they went into the oven to bake. This was a perfect time to stop for a nap!

By the time naptime and lunch was over, the beads were cooled and ready to be painted. This is a messy step, but oh so much fun! She chose the brush she wanted and we sat down and painted each individual bead. Yes, there was alot of paint on our hands, but the end result was really pretty. She got very creative and used different colors on each bead. Normally, my daughter likes to mix all of her paint colors into one shade of muddy brown, but today she preferred to keep them separate. While I would have loved her muddy brown beads, it was definitely more fun to see the beautiful colors instead!

The beads awaiting their turn

The beads awaiting their turn

After painting, I placed the beads on a baking cooling rack to dry. Once dry, we were ready to string them. The original project calls for twine, but our twine was a mess, all splintered and unraveling. I envisioned nothing but rope burns on our neck if we used it. I searched for an alternative and decided wrapping ribbon was a perfect choice. Next time, I would plan ahead and use pretty fabric ribbon instead. I cut the ribbon and she picked the beads she wanted on each necklace. In the end, we made about eight necklaces. She designated each one for herself, mommy, daddy, and a few friends. ‘

A rainbow of beads

A rainbow of beads

She was so thrilled with her creation. A few days later, we met friends at the mall, and she brought them their necklaces to wear and we wore ours too! She was so proud when other shoppers noticed and complimented her jewelery. This is one project I plan on using again and again. It would make a great Mother’s Day gift for mommies and grandmas!

Wearing her creation

Wearing her creation

For the recipe and complete instructions, visit the article “I know you want one!