Candle in the wind

August 11, 2009

I’ve decided that I want to spend less time documenting the things I do with my daughter and more time actually doing them, so I will no longer be updating this blog.

I do however have a blog dedicated to documenting all of my baking adventures…cakes, cookies and the like. Please visit my blog at http://www.madventuresinbaking.wordpress.com

Thanks for stopping by!

Daddy Rocks!

June 19, 2009

To celebrate Father’s day, I looked for an easy craft my daughter could make for her daddy. I wanted something she could make mostly herself and something he could keep at work to put a smile on his face during a stressful day. I found this simple craft for a paperweight at Family Corner.

photo courtesy of familycorner.com

photo courtesy of familycorner.com

I love salt dough! My daughter really enjoys mixing the ingredients together and then squishing the dough. It’s a wonderful sensory experience that even toddlers or young preschoolers will enjoy. I let her smash the dough into whatever shape she wanted…this meant mostly a giant lump.

I didn’t have any pea gravel as called for in the directions, but I did find some nice glass rocks in my craft box. These are the kind of rocks you would use to put into a vase or candle arrangement. The directions state to arrange gravel pushed into the dough to spell out “Dad Rocks”. Since I wanted this craft to be hers as much as possible and since at almost 3 she can’t spell, I let her arrange the beads as she wished. She thoroughly enjoyed smooshing them into the dough.

weight 002

I placed the dough onto a cookie sheet sprayed with non-stick spray. I baked it for 2 hours at 250 degrees. Then it cooled for about an hour. It looked pretty nice just plain as it was.

But I thought it would be much more fun to let her paint it too! Daddy is a huge Dallas Cowboys fan so I happened to have navy and silver acrylic paint on hand. That part was pretty fun too!

weight 003

I made sure to let her know that this was a surprise for Daddy for Father’s day. But in true preschooler style, when Daddy asked her about her day that evening, she described the wonderful surprise she had made him! We couldn’t help but  laugh at her excitement. The best Father’s day gift for him and any dad is the adoration and love of a child. My husband has that gift 365 days a year!

What a cool paperweight!

What a cool paperweight!

Happy Father’s Day to my awesome husband who is a wonderfully loving Daddy!

For complete instructions and ideas for other Father’s day crafts visit: Dad Rocks at the Family Corner website.

Gone Fishing

June 11, 2009

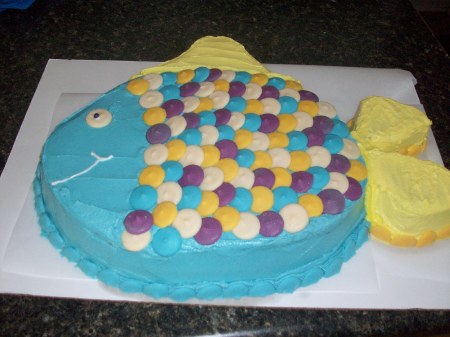
I was recently thrilled and honored by my friend Sheila’s request to bake her daughter’s birthday cake. I love a good reason to bake something fun and what better reason than for the birthday of one incredibly sweet two-year old? Her party was being held at a local splash park and so Sheila chose a fish theme for the decor.

Kids Kampus Jacksonville, FL

Kids Kampus Jacksonville, FL

Sheila is very crafty and her party decor is always perfectly matched to her theme. She found a recipe for an adorable fish cake at the Disney’s Family Fun website. I was excited to make this cute cake and hoped it would put a smile on the birthday girl’s face! I also hoped it would live up to Sheila’s expectations as I didn’t want the cake to be the dud in her party decor!

After reading the recipe, I knew immediately that the Necco wafers had to go! Have you ever eaten a Necco wafer?

image courtesy of the Candy Baron

image courtesy of the Candy Baron

If you haven’t had the umm…pleasure…count yourself lucky. I think of Necco wafers as “old people candy” and with that said, I apologize to any seniors reading this. But Necco wafers taste like lightly sweetened chalk and the thought of covering an entire cake in them was frightening. Sheila suggested using candy melts and they turned out to be the perfect solution. What could be better than covering a cake in candy?

candymelt

The inside of the cake was a yellow cake. I’ve been testing recipes to the find the perfect yellow cake one and finally discovered one I love…all thanks to the wonderfully resourceful Bakerella. Here is the link for her yellow cake recipe. Now I did make a few changes to get the cake I wanted. Instead of all butter, I used half butter and half butter-flavored shortening. This really adds some extra moisture to the cake. I also used 2 teaspoons of vanilla instead of vanilla and butter flavoring. I tried her sugar water trick, although I brushed it on with a pastry brush, and think it did help to keep it moist.

The original fish cake directions state to bake a 13 x 9 cake to cut out. I did bake it that size, but before cutting out the shape, I ran a cake leveler through the middle to create two layers. I then frosted the middle before I cut the shape out. This did make it more difficult to cut, but more frosting means a moister and more flavorful cake. One of my pet peeves is a sheet cake with no center frosting. The cake tends to be dry and you end up with a mouthful of dry cake. Don’t get me wrong, I will still eat such a cake as I haven’t met a cake I’ve turned away yet, but a little more frosting is the difference between a good cake and a great one!

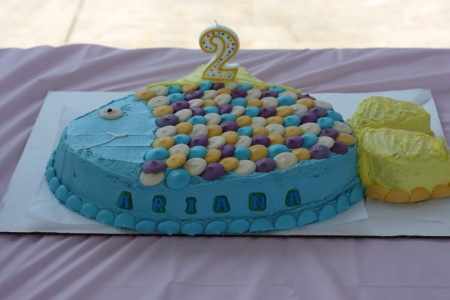
I used Wilton’s buttercream icing recipe. There are more flavorful icings (or frosting if you prefer that term as I do), but this one really holds up well in the heat. This was an outdoor party at the end of May so that was definitely a concern.I tinted the frosting as directed. After frosting the cake, I added the candy melts by alternating the colors to create the scales. I wasn’t happy with the unfinished edge of the bottom of the cake. I could have piped frosting around it, but instead cut candy melts in half to create a border. I have to say, while this cake took some time from start to finish, I was pretty happy and proud of it!

june 001

In retrospect, I would make a few changes if I were to make this cake again. I realized somewhere around midnight as I was decorating, that I had no where to write “Happy Birthday” or the birthday girl’s name.  I should have used fondant to cut out the letters and attach to the side of the cake. I improvised on the way to the party, stopped at the grocery store and purchased those candy letters sold in the bakery aisle. They did the trick, but the fondant letters would have been bigger and I think prettier. In the future, I also would save some of the batter to make one cupcake. The candle could then be placed into the cupcake and the birthday person would have their own mini-cake. As it was, we placed the candle on the top fin.

photo courtesy of Sheila Sierra photography

photo courtesy of Sheila Sierra photography

All the  party guests seemed to get a kick out of the cake and really enjoyed it! Most importantly, the birthday girl had a smile on her face as she blew out her candle! Making this cake just reminded how much I love baking for children and I can’t wait to do it again!

Sweet nothings

May 19, 2009

It was yet another week of steady Florida rain. In and of itself, the rain is not an issue. But when it is preceded by a week of a sick kid cooped up in the house waiting to feel better so she can GO OUTSIDE AND PLAY, well…it’s an issue. So there we were, desperate for diversion and crankiness loomed on the horizon.  We had made some paint crafts the previous day and when I suggested a similar project, my daughter’s lack of enthusiasm could be felt from across the room, where she sat begging to watch TV. So I countered with a cheerful “let’s make cookies!” Now that got her moving!

I was almost knocked down by the  powerful SWOOSH of a child dashing by me and into the kitchen. By the time I made it in there after her, she had already pulled the kitchen chair up to the counter and was demanding a wooden spoon. At that moment I thought, “gee I really hope I have ingredients to make cookies”. Something I probably should have considered sooner. Thankfully, I had the makings for a batch of sugar cookies. Well, technically I didn’t have enough butter. But part butter, part margarine, part shortening sugar cookies would do just fine!

Ingredients in...

Per the recipe (which I quickly took off the back of the sugar bag), I needed to chill the dough for an hour. To an almost-three-year-old an hour might as well be forever, so we went ahead and rolled the dough out anyway. It was definitely stickier than if we had chilled it. Here’s a handy tip to help with clean up when making cut out cookies…parchment paper.

cookies 014

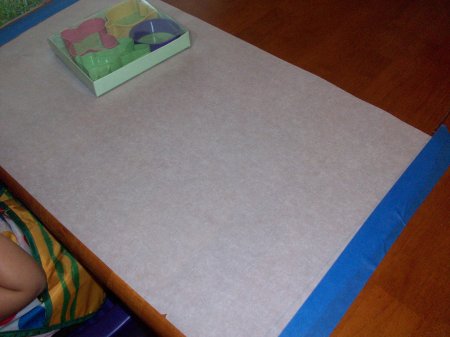
I cut out a large piece of parchment paper and used painters tape to attach it to the table. It serves two purposes. First, it keeps the mess off the table so all I have to do is roll up the paper and toss it into the trash. Second, because it is a fairly nonstick surface, less flour is needed. When you have a child who likes to toss the flour all around, the less flour the better! If you haven’t used parchment paper in your baking, I highly recommend it. It will help your cookies brown evenly and reduce the need to grease the pan (works great for cakes too)!

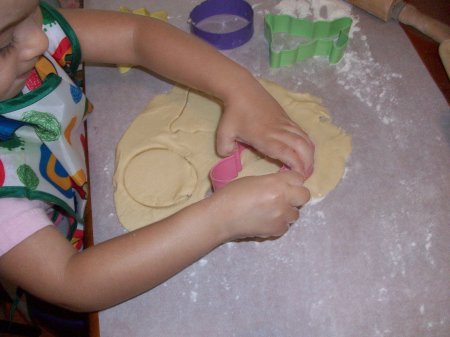
My daughter is getting pretty good at using the cookie cutters. I help her roll the dough out by using a mini sized rolling pin that I purchased just for her. After that, she chooses the cutters she wants and presses them into the dough.

cookies 016

My original intent is to have her cut out all the cookies. I know she will have a lot of fun with this. But while the first batch is in the oven, the baby lets me know in no uncertain terms that she needs to be nursed NOW. One look at the clock reminds me that it’s past lunch time and nap time is coming up too. I decide to take care of the children’s bellies and deal with the cookies later. During nap time, I cut out cookies from the remaining dough. My daughter’s disappointment will be eclipsed by her delight of the next step…decorating!

I had planned on whipping up a quick batch of icing…powdered sugar, butter, vanilla, milk. Simple. Quick. Then I look at my sink. My sparkling clean sink. Next to my sparkling clean sink is my sparkling clean mixer and my sparkling clean mixing bowls. I had just washed everything. Did I really want to do it all again? A quick peek in the pantry reveals…

cookies 020

Thank you Pillsbury for making life a little easier!

cookies 028

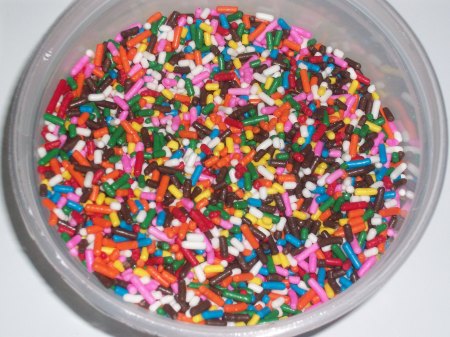
And thank you sprinkle makers for making sprinkles look so darn colorful and cheerful!

Nap time is over and the fun begins!cookies 033

After frosting a few cookies she informs me that her hands are too dirty and that “you should frost them mommy”. The sprinkling of happy sprinkles is what she is really after anyway.

cookies 035

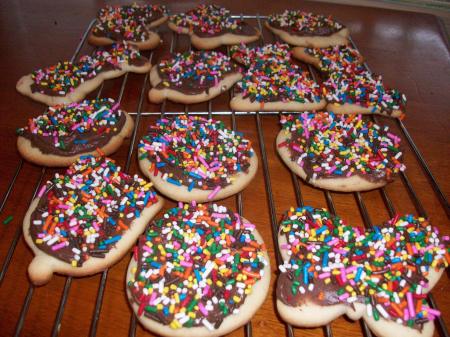
And boy can she sprinkle! I mean, thick coats of sprinkles on each cookie. I have to go behind her and shake off the excess. But what a beautiful collection of happy rainy day sugar cookies we created!

cookies 037

Cake pops for a cause

May 6, 2009

In memory of my beautiful mother, who was diagnosed with Alzheimer’s disease seven years prior to her death, I will be walking in the Alzheimer’s Association 2009 Memory Walk. My husband and I participated in the walk a few years ago, but this year we will be walking as a family of four. Of course technically the baby will be in the stroller, but at 3 years old, my oldest will be walking by my side this year!

I also decided to take my new found obsession with Bakerella’s cake pops and put that energy to good use. She recently posted on her blog that she had made her cup cake pops for the American Cancer Society’s “Relay for Life”. Check out the story Cute for a Cure! I was so inspired that I contacted the director of the Alzheimer’s Association’s North Florida chapter and offered to do the same for the Memory Walk. She was thrilled with the offer!

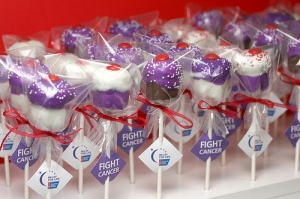
So I will be making about 200 cake pops to sell at the walk this year! Every penny of the sale will be donated to the Alzheimer’s Association in my mother’s honor. I really hope these turn out well and that I raise a large amount of money during the walk. The walk isn’t until November, so I have some time to work on my cake pop making skills. Here is a picture of the ones Bakerella made.

photo curtesy of Bakerella

photo courtesy of Bakerella

I plan on making the regular cake pop version instead of the cupcake pop. I think that will help to make this a reasonable task for me. It turns out that the Alzheimer’s Association’s color is also purple so mine will look similar.

photo curtesy of www.alz.org

photo courtesy of http://www.alz.org

If I get really inspired, and depending on what is going on in my life in November, I might attempt to make candy versions of the Forget Me Not flowers to attach to the pops. This flower is a symbol used by the Alzheimer’s Association.

If you are in the North Florida area, please sign up to walk and raise funds for Alzheimer’s research. If you are there, please make sure to visit my table and buy a cake pop (or two or five)! If you aren’t in the area, you can still help by making a donation to the cause. Click here to be directed to my Memory Walk fund raising page. This is a website created and monitored by the Alzheimer’s Association and all funds go directly to them.

If you want to help even more, you can sign up as a member of my team. This will create your own webpage which you can then forward to friends, family and coworkers. You don’t have to be present at the walk to raise money, so you can join my team no matter where you live.

Or you can even start at team of your own. Check out the Memory Walk website for more information. This is a cause that is so very close to my heart. I never want my daughters to have to suffer the slow and painful loss of their mother the way that I did.

To learn more about Alzheimer’s visit the Alzheimer’s Association online!

This is for the birds!

April 29, 2009

Beautiful spring weather means lots of birds in our backyard…all coming to feast at our bird feeders and take a swim in the bird bath. We love to watch the birds almost as much as our dog loves to chase them. But luckily for the birds, the dog is too slow and too fat to ever come close to catching them!

With the exception of the cardinals, we don’t know a thing about what types of birds visit us. Our observations are limited to things like “look at that black bird…check out that pretty brown bird.” I would like to say that we spent the afternoon studiously looking up bird species and identifying ours, but we are pretty content with our generic color descriptions. What my daughter and I decided to do instead was make birdseed biscuits for them. My guess is that the birds probably appreciate that more than finding out their “real” names.

There are many birdseed treat crafts out there. Most include some sort of peanut butter and a pine cone. Nothing against peanut butter or pine cones, but I found a craft  that was a little different. I came across it in the Family Fun magazine. This is a really great and inexpensive magazine that is always full of fun ideas for crafts, activities, and parties. There are also lots of great parenting articles and kid friendly recipes as well. You can also find the complete instructions at their website under birdseed biscuit.

This is a pretty simple recipe that consists of only 3 ingredients…birdseed, flour, and water. We broke out the mixing bowl and my daughter happily mixed everything together.

birdseedmix

Always the fun part

The instruction calls for the birdseed mixture to be packed into cookie cutters and then baked. I chose two pretty spring shaped ones…a tulip and a butterfly. My daughter easily scooped out the mixture and packed it into the cutters with minimal help from me.  She was thrilled to be able to handle this pretty much by herself.

birdseedfill

Pretty fancy for birdseed

The biscuits require baking at 175 degrees for an hour. My oven model is of the modest variety (i.e. cheap) and doesn’t have a fancy digital setting on it. So, I baked them at around 200 degrees and they came out  just fine. I let them cool for a little while before stringing them with some ribbon. Then it was off to the backyard to find a good spot to hang them.

birdbiscfinal

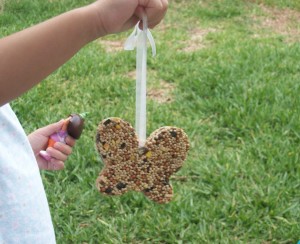
Our butterfly birdseed biscuit

Of course my daughter wanted to hold the biscuits and have the birds come to her…as she cheerfully called out “here birds..here’s your treat birds!” After explaining to her that the birds wouldn’t come with the dog salivating next to her, ready to pounce, she agreed to hang them on the fence.

The next morning we noticed the tulip biscuit was gone…bird or squirrel? We will never know. But two birds sat on the fence eyeing the butterfly biscuit. I’m quite certain brown bird and off white bird will be happily enjoying their treat soon!

Bunnies and chicks…oh my!

April 24, 2009

Easter…another holiday…another excuse for some fun baking! Do I really need an excuse though? I love holidays…just about any holiday can be made more special by a fun and thoughtful dessert. My daughter is now at the age where she can appreciate a cute cake or confection. She was born with a sweet tooth and has come to expect a cake at any and all celebrations. And while she would eat any cake, cute or not, it’s nice to get a smile and “Wow, a bunny cake!” out of her.

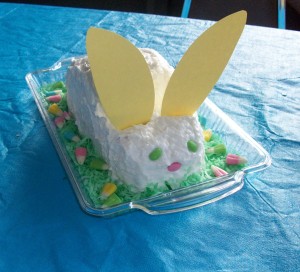
I remember the first time my mother made me an Easter bunny cake. I thought it was the coolest thing in the world and I adored her for making it. I’ve been waiting a long time to step into Mima’s shoes and make one for my own daughter. This Easter was the year! I was probably more excited to make it than my daughter was to see it, but it was a joy to make nevertheless. It is a simple bunny cake…no fancy shaped pans or laborious decorating techniques. An old fashioned cut out cake from a box mix and canned frosting.  But it was chock full of love!

Hippity hoppity!

Hippity hoppity!

I followed the instructions from the Betty Crocker website. I decided to go with a strawberry mix for the cake and  coconut frosting. For the eyes and decorations, I used cute “bunny corn” which is pastel colored candy corn I found at Michael’s. It was as delicious as it was adorable!

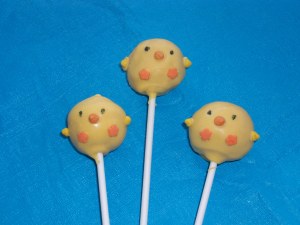
Since the cake only used one layer of a two layer mix, I needed to make something with the leftover batter. At first, I thought I would make cupcakes out of it. Then I decided to be adventurous! A friend had turned me on to Bakerella’s blog and her too-cute-for-words “cake pops”. Cake rolled into balls, coated in chocolate, on a lollipop stick…I couldn’t resist. I took one look at her sweet chick pops and decided to go for it! The first time trying something new is challenging. Trying something new at 8:00 at night after putting the kids to bed and still needing to pack for a trip the next day is a bit insane. But there I was at 11:30 at night still making my cake pops. Oh but it was completely worth it! How cute are these?

Almost too cute to eat!

Almost too cute to eat!

The cake pops were addictive to make. I’m already planning on making some fish ones for my friend’s daughter’s birthday party and I can’t wait! I don’t think there is an occasion that these  pops can’t be adapted for. The possibilities are endless…which means you will see more posts of my Cake Pop Adventures!

Salty Rainy Day Fun

April 24, 2009

A powerful Florida rainstorm was looming. The kind of day that pre-children, I might have spent with the windows open, curled up on the couch with a good book. But instead of looking forward to the dark and cloudy day, I wondered how I was going to entertain my daughter and keep my sanity while we remained indoors all day. I needed an activity that would take up a substantial amount of our day, but that could be broken down into steps that we could squeeze in between nap, lunch and the like.

I discovered a wonderful activity that fit my quest nicely on the Slugs on the Refrigerator blog…salt dough beaded necklaces! Each step incorporates a different type of activity…mixing, shaping, baking, painting, stringing. It’s like five crafts in one. Just what we needed to amuse ourselves on this rainy day.

When I informed my daughter that we were going to make necklaces, she was happy. When I broke out the mixing bowl she was thrilled! She loves the opportunity to mix anything in the bowl, mostly because it usually results in some sort of sweet treat, but also because she gets to be a big girl in the kitchen.  We began by mixing the dough ingredients and while she was more than happy to help me measure the dry ingredients, I had to remind her that this was not something we wanted to taste test! Of course the best part was digging our hands into the dough to knead it to the right consistency. I made the whole recipe, but only used half and stored the rest in the fridge. Half of the recipe was more than enough for one child to make enough beads.
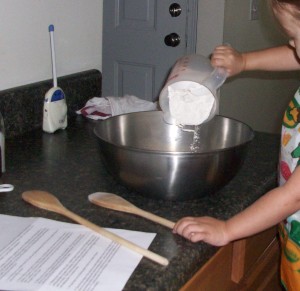
Careful measuring

Little hands...careful measuring

Next, we sat at the table and shaped the dough. Her shapes were far more creative than mine! I was careful not to tell her to make them the exact way I was. She watched the neat little balls I was rolling and flattening, but had more fun making hers into various shapes. As we made each bead, we laid them on a cookie sheet that we sprayed with non-stick spray. When she was otherwise occupied, I made holes in each bead with a wooden skewer. That was one step I just felt she wasn’t ready to handle…maybe next time. After making the holes, they went into the oven to bake. This was a perfect time to stop for a nap!

By the time naptime and lunch was over, the beads were cooled and ready to be painted. This is a messy step, but oh so much fun! She chose the brush she wanted and we sat down and painted each individual bead. Yes, there was alot of paint on our hands, but the end result was really pretty. She got very creative and used different colors on each bead. Normally, my daughter likes to mix all of her paint colors into one shade of muddy brown, but today she preferred to keep them separate. While I would have loved her muddy brown beads, it was definitely more fun to see the beautiful colors instead!

The beads awaiting their turn

The beads awaiting their turn

After painting, I placed the beads on a baking cooling rack to dry. Once dry, we were ready to string them. The original project calls for twine, but our twine was a mess, all splintered and unraveling. I envisioned nothing but rope burns on our neck if we used it. I searched for an alternative and decided wrapping ribbon was a perfect choice. Next time, I would plan ahead and use pretty fabric ribbon instead. I cut the ribbon and she picked the beads she wanted on each necklace. In the end, we made about eight necklaces. She designated each one for herself, mommy, daddy, and a few friends. ‘

A rainbow of beads

A rainbow of beads

She was so thrilled with her creation. A few days later, we met friends at the mall, and she brought them their necklaces to wear and we wore ours too! She was so proud when other shoppers noticed and complimented her jewelery. This is one project I plan on using again and again. It would make a great Mother’s Day gift for mommies and grandmas!

Wearing her creation

Wearing her creation

For the recipe and complete instructions, visit the article “I know you want one!

Magic Butterflies

April 22, 2009

Magic Butterflies float above my daughter’s bed. They flutter and fly sending sweet dreams tumbling into her sleepy head.


These peaceful butterflies were born out of a morning of aggravation and a commitment to not be wasteful. In one of my delusional moments where I refuse to accept the fact that life is more complicated with two little ones, I decided to venture into the grocery store to do some shopping. And by grocery store I mean Walmart…on a busy Saturday…you get the picture.

With the baby strapped into a front carrier and my toddler in the shopping cart, I felt like productive Super Mommy! After an hour of maneuvering around oblivious shoppers and trying to keep my toddler happy while also attempting to continually bend down without spilling the baby out onto the floor, I was turning into Super Cranky Mommy instead. So by the time I got to the coffee filter aisle, I just wanted to get the trip over with. I didn’t even glance at the package in my hand before flinging it into the cart and making a mad dash to the checkout lane.

It wasn’t until the next day when I went to make that glorious pot of morning coffee that I discovered I had bought filters that were too small.   So there I was stuck with 150 filters that I couldn’t use, but refused to throw away. They had to be good for something right? And so began the search for craft projects that involved coffee filters. I was thrilled to learn they can serve a purpose after all when I discovered the butterfly project. You can find the complete instructions for this project at Kaboose.com.

My daughter loved painting with the watercolors and the colors bled very nicely and quickly onto the filters, which was perfect for a 2 year old attention span. I placed old dish towels underneath the filters as we painted them in order to absorb all the water.

The filters' metamorphis

The filters' metamorphous

After we finished painting, we laid them on a baking cooling rack to dry and went outside to play. By the time we had run around the yard for awhile, the filters were dry. After we folded them into a fan shape, I used pipe cleaners (she picked purple ones) to twist around the filters creating the antennas. I then used fishing wire and tied each butterfly to one of my daughter’s hangers. I was able to tuck the hanger under some heavier items on the shelf above her bed as an anchor. You could easily tape these to a shelf also for the same effect.

Now she lies in her bed and watches her butterflies float and tells me proudly that they are “so pretty Mommy and I painted them myself”. Her love of the project was completely worth the aggravation that preceded it. Five coffee filters down…145 to go!

Magic Butterfly

Our Magic Butterfly